Here is a test of how the rig holds up animating. I think it went pretty well, I was happy with its results. I had to use Mental Ray for this quick render due to time, but I am planning on extrapolating this project to full completion for the rest of the semester. I add in some more details to his head like a headress and other accessories, and do a better paint job while rendering with RenderMan.
This is just the first few lines of the Vulgrim monologue audio.
I followed a tutorial from Digital Tutors that demonstrated a fantastic joint-based facial rig. It started off by placing curves on the geometry. You had to make the surface live so the CVs snap to it.
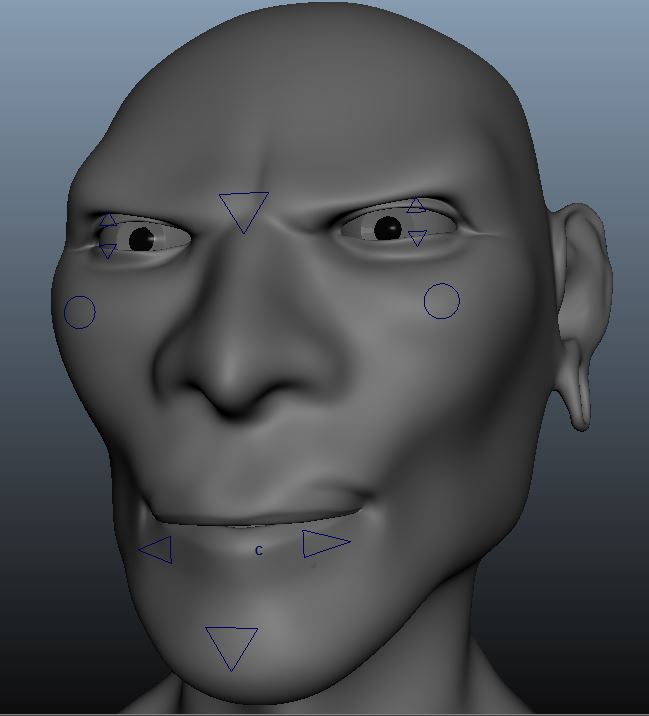
Facial Curves
Then, locators are motion pathed to the curves. Motion paths are ways for geometry to follow a curve from start to end. 3 Locators are put on each curve, and set to start, middle, and end, so the result is 3 evenly spaced locators that move with the deformation of the curve. I can move the CVs around and the locators always stick to their spot on the curve.
Joints are then placed and parented to the locators. Now the joints follow along too.
Joints placed and parented to the locators on the curves
Another set of joints (control joints) is placed once more as children on the original joints (offset joints. So now they can move independently, but will follow the transforms of the parent joints, which I’ll explain in a moment. I can take the shape node of a NURBS sphere and parent it under the child joints or control joints as they are referred to. This makes them function as a joint, but appear as a sphere, which is easier to see and grab.
Hierarchy of joints. In center, Locator, then offset joint, then control joint. Over and over and over and over for all joints.
The next process is the weight painting, which is long and tedious. It uses “post weights” which means verts can receive more than 100% influence. For example, the nose vertices can have 100% influence from the 4 joints around it, and when all four joints move in the Z axis 1 unit, the verts move 4 units, four times the amount due to 400% influence of the total. It is easier because the weight doesn’t jump around to random joints when painting 0%, but can be tricky to get transitions down.
Jaw weighting
Here is an example of the jaw weight. It is controlled through a curve and an expression that says ‘when you move in a negative Y value, the jaw joint is going to match that with its Z rotation and multiply it by 15.’ Expressions were a tremendous help in this, as there are many connections.
All the control curves worked on this principle. The neat thing about the curves is that they can be blend shaped. Normally blend shapes occur on geometry, but since it is off limits due to the skinned and joints, there is another way.
The curves can be duplicated and manipulated by CVs just like you would with geometry verts, and then blend shaped on the original. All of the expressions worked on this principle.
Naqshi’s brow curves being manipulated and the blend shape active on the original
You can see how the original curves in this are matching the copy which is manipulated via CVs. The geometry is in turn being manipulated through the joint system and the fact they follow the curves. This is where the offset and control joints come it. The offset joints are driving the deformation with the blend shapes by moving their children, who are skinned to the geo. The control joints can move independently to manipulate the geometry, AND receive the parent info from blend shapes to ultimately deform the geo through individual control and parented transforms of blend shapes. So in a long winded but simple way, the blend shape drives the curves, which drives the locators, which drives the offset joint, which drives the control joint, which drives the geometry. Perhaps now it is easily understood why rigging is a lesser desired process of animation. All lightheartedness aside, this rig was very powerful.
Demonstration of expressive deformation via controls and blend shapes
All of the expressions and visemes were just blend shaped and connected to a control through the expression editor (not to be confused with expressions in the context of emotive facial deformation). Expressions are short scripts that tell an objects values and attributes how to act.
All the blend shape curves
Above is all the copies of curves that were morphed into blend shapes.
Throughout the whole process, I have been continuously playing the Vulgrim voice clip that inspired the character design. My sculpting and design process was a bit more open without any concrete concept, so the face and essence may have gotten off track a bit.
Naqshi came out with features of African American or South American cultures. I found some resemblance to some indigenous tribal type of people. I really loved the look of him, but his jawline, nose, brows, practically all of his face, seemed to display more power and strength than the voice of Vulgrim. The original voice is slightly higher pitched, yet still mysterious. However, the figure image that comes to mind is more skinny, nimble, and gaunt that powerful. Naqshi seems like the patient type that uses his mind before body, but could probably still be physically intimidating. He seems wiser and older, but not old enough to have a timbre and high pitchedness of an elder man. His voice should be very calm and smooth, which comes through in Vulgrim’s audio.
After some playbacks, comparison and imagination, I decided the Vulgrim voice wasn’t fitting quite right. Fortunately, the solution was as simple as lowering the pitch. The timbre of the voice remains intact and I was really pleased with the results.
Gave me a couple chills just hearing it!
Check out the image and sound clip of Naqshi and see for yourself how it fits his appearance.
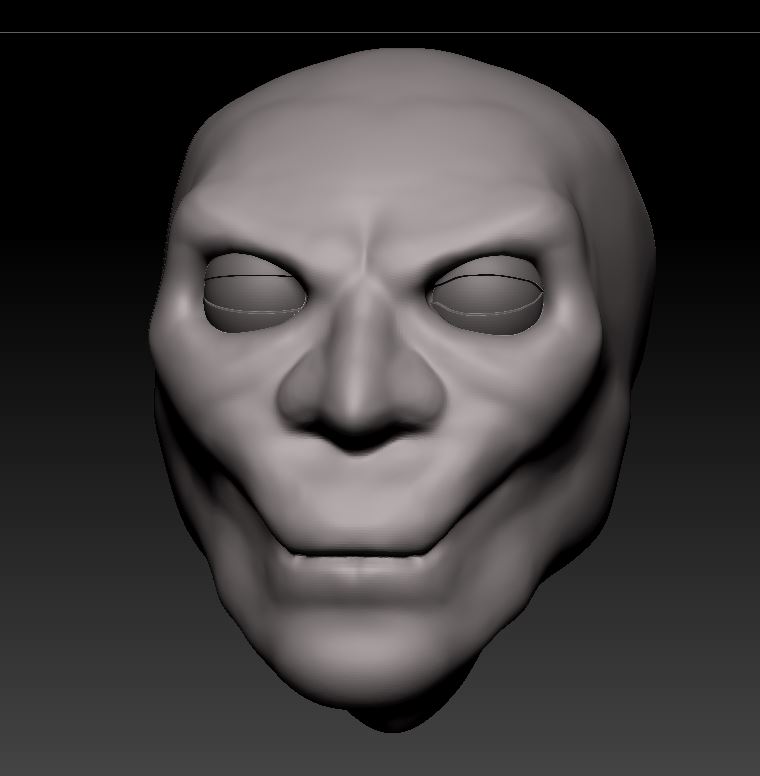
The character for the monologue, who I have named Naqshi, needed a base mesh that was clean for animation. The sculpt was done with dynamesh, which doesn’t give you clean edgeflow or low poly optimization.
I typically use the remesh feature in zbrush with the guidelines to show it where to draw loops. I wanted to tackle it with a bit more control and learn how to manually retopo. Zbrush has a nice tool that will allow you to draw on a surface to create individual faces and connect them. You essentially have to draw every vert, but it is a necessary evil to get what you want.
You can see the process here:
I did an auto remesh on the dyna sculpt so it was quicker to process, and to give myself some guidelines to follow when I was doing the retopo. I start with lip and eye loops, and try to draw out from there. I originally tried to draw on the mesh and plan out the entire low poly remesh, but I was having some trouble with it and just wanted to dive in. I think if I did it again I would probably draw out the remesh before doing anything, just because its easier to fix problems in that process versus during retopo.
This was the final base after the retopo. There were some loops around the mouth that I could have deleted but unfortunately, I got ahead of myself with a couple of things and I don’t want to go back and edit the topo again because I will have to reproject and reUV and re-export some maps. I will be applying a displacement map so it shouldn’t matter that much.
After I had the base, I projected the details from the Dynamesh back into it at a level holding around 5 million poly I believe.
I had some concepts from previously explored reference photos. I really wanted an orthographic reference that I could import into Zbrush and sculpt. However, I didn’t really draw anything that I was happy with. And couldn’t find any pre-drawn templates to work from. I decided to just start sculpting and see what happened.
I typically do not like going free form with humans because proportions are very important. However, miraculously, I was able to keep at it through some frustration and iteration to get something I was really happy with. I started with prominent brows and gaunt cheeks and just went from there. My main reference was the face of this photo:
This was my first iteration of the whole face. It came out very reptilian with large lips and a wide mouth curving to follow the skull.
After talking to Steve, it was decided that the mouth would be difficult to animate with the extended reptile like opening. So I went back at it and smoothed out his cheeks a bit more.
This was the final dynamesh:
I realized I should probably open the mouth to make the rigging process easier. The unfortunate part of this is opening the mouth and resculpting most of the lips. The only part about this was that I was extremely fond of the current lips, but they can be tweaked later.
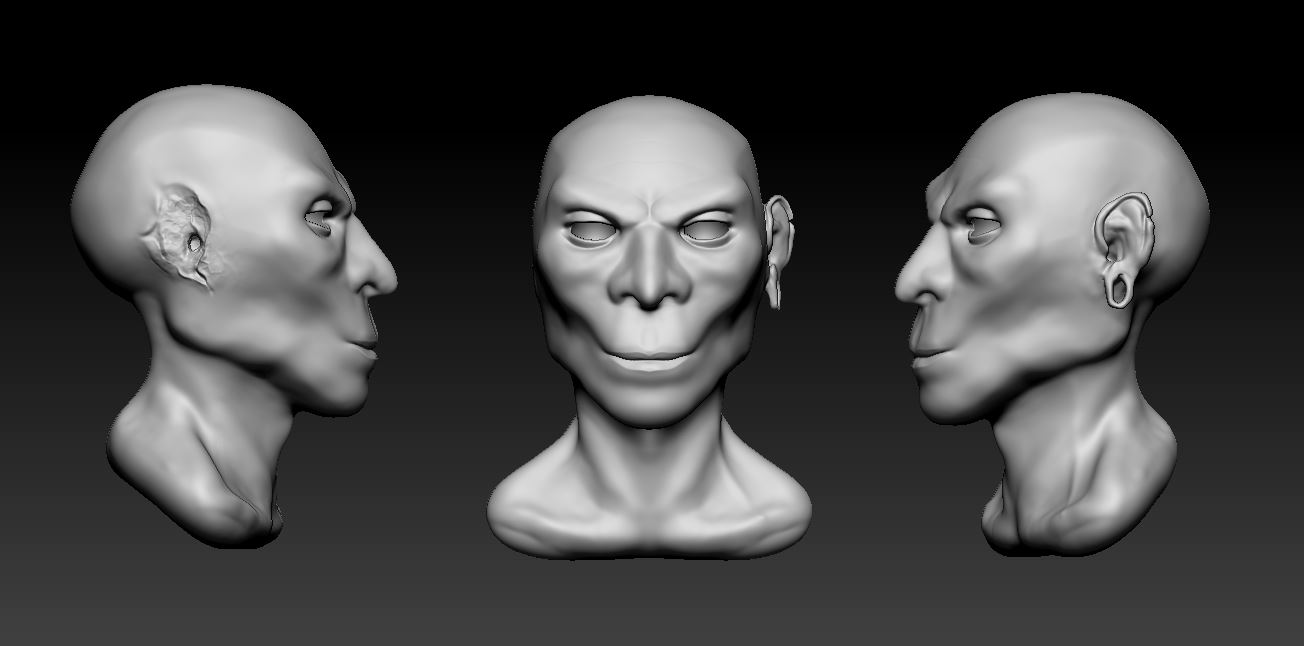
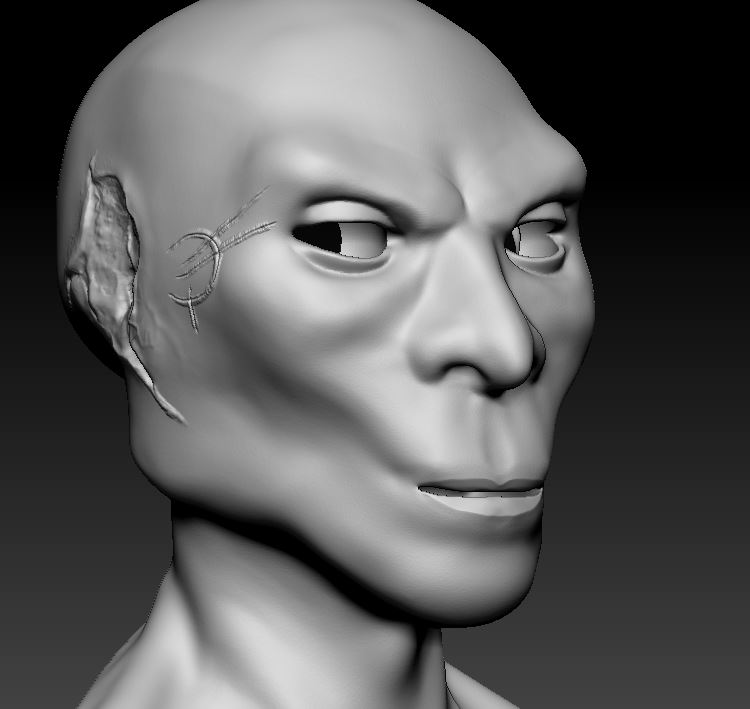
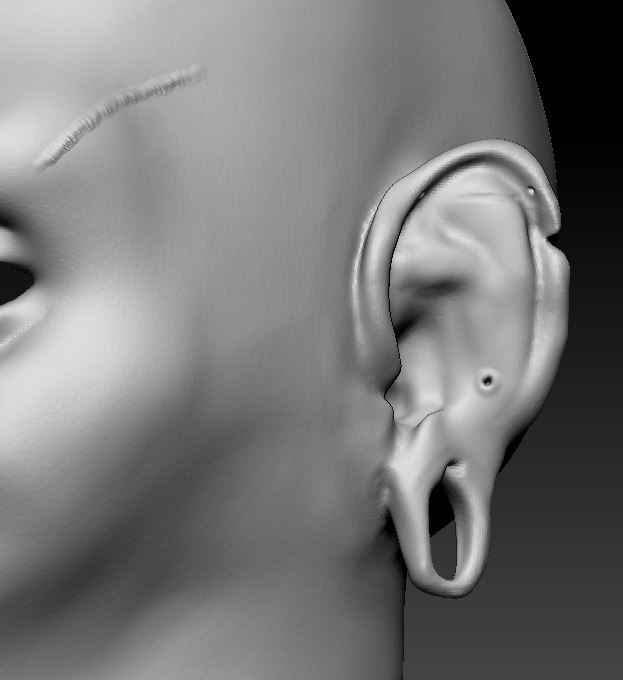
You’ll notice the open mouth in this and how the lips are a bit thinner. I also added some scars to the face and his missing ear. I also added some small holes for piercings.
Overall, I was very happy with the results. I will most likely go back and add some subtle wrinkles and refine the skin pores.
I started a new project for the Animation II course, where I have already completed a simple character design and stylized walk cycle. I will be uploaded this project soon in the portfolio page. I hope to use this character and rig for some body language studies, for its face is actually a chattering teeth toy, without the ability to express itself facially. One of the parallel studies with my thesis is the mechanics and psychology of kinesics, the study of communicating with motion and bodily expression.
My next project is a facial rigging and animation assignment. I considered using the Caesar Bust to rig and animate his potential expressive features. However, I wanted to do a little more experimental approach. I decided to take the content from an audio clip originating from a game I used to play, and design and animate a character based the nature of the voice. This is more closely related to interpreting the content of a painting and adding in motion to support a certain theme.
I chose the character Vulgrim, from Darksiders. There is a scene where the main character meets the demonic merchant, who has a nice little monologue with his mysterious and wispy voice. I had always been fond of this character design, but the unfortunate part is that his face represents a skull, without skin or lips or any real facial features that can be dynamically deformed to animate expressiveness. My goal was to capture some of his essence through his voice and redesign him as a witch doctor. I chose this type of character because typically, witch doctors are also mysterious, conniving, and of a similar visual portrayal.